FlashLex Things
- Overview
- Provisioning A Thing
- About The SDK Distribution
- Downloading Your Thing’s SDK Distribution
- Installing the Distribution
- Bootstrapping Your Thing
- The FlashLex Configuration File
- Running FlashLex IOT on the Command Line
- Sending a Test Message (Ingress)
- Running FlashLex IOT as systemctl Service
- Collecting Messages (Egress)
Overview
FlashLex Things are actually any device capabile of running the FlashLex Distribution and SDK. Currently that means any device that can effectively run Python applications in an automated way.
Commonly this is a small single board computer such as a Raspberry PI but really it can be any python based computer with enough resources to run teh FlashLex Python distribution.
There are a few expectations we about your thing that would enable your ability to effectively install and run the distribution.
-
Your thing has enough memory and compute scale to run the FlashLex distribution.
-
Your thing is connected to the internet.
-
You can SSH into your thing to install the distribution.
This guide will cover a few concepts essential to standing up your FlashLex IOT fleet:
-
Provisioning A New Thing
-
Downloading The Thing Distribution
-
Bootstrapping
-
Sending a Test Message (Ingress)
-
Collecting A Message From Your Thing (Egress)
Provisioning A Thing
All things are provisioned from the "Things" Page. It is one of the top line menubar items as peer level to "Dashboard", "Access Token", and "User Settings".
Start by going to the "Things" page and clicking the button that says "Create Thing"
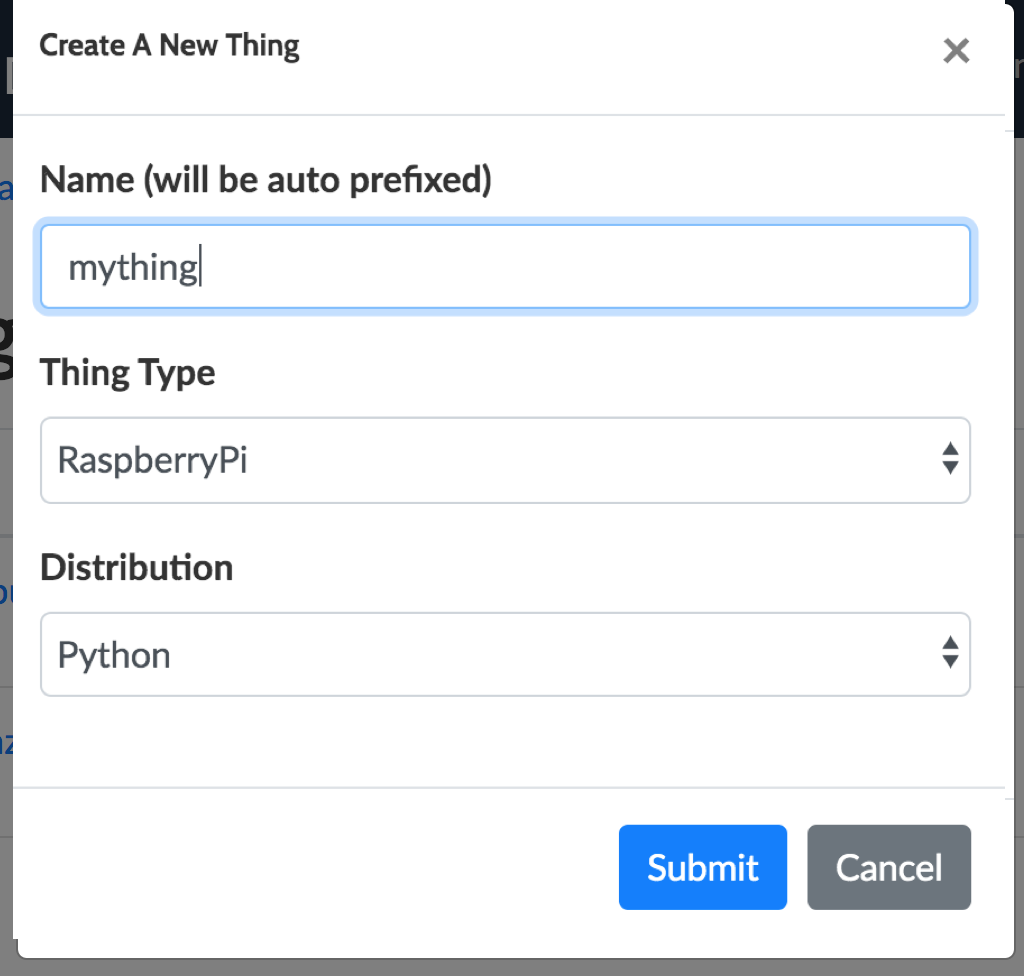
Give your thing a name and choose "Submit".
Once you do this the FlashLex application will orchestrate provisioning the cloud infrastructure for your thing. This includes building out your things topics, establishing the security rules, provisioning certificates and more.

At this point you have the cloud infrastructure created, but no messages have been sent to your thing (ingress) or have been recieved from your thing (egress) so it is impossible to verify that the thing is actually up and running. Next step is to download and install the SDK on the thing and bootstrap it so you know it works.
About The SDK Distribution
Your thing really is just software that allows a Python3 enabled device to run securely. Its job is to make it possible for almost any Python3 enabled computer to become a FlashLex Thing that can be easily integrated with your custom Python Thing application. When you download the distribution it has everything in it you need to integrate your custom thing application with FlashLex.
What is in The FlashLex SDK Distribution? The FlashLex SDK Distribution is a zip bundle file intended to be download and installed on the thing that you would like to integrate your custom application.
-
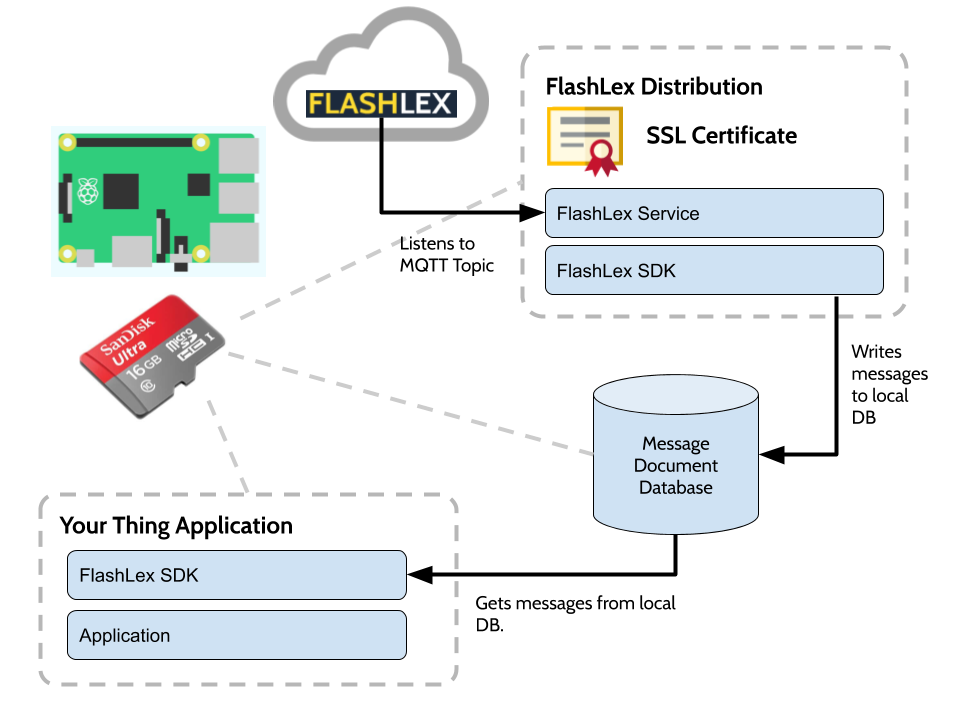
FlashLex Bootstrap - FlashLex Bootstrap is a stand alone python application that will allow you to verify that your thing is connected to the internet and works with FlashLex.
-
The FlashLex Service - The FlashLex Service is a systemd service that can be installed to actively monitor the ingress topic for your thing and recieve messages over the MQTT topic.
-
The FlashLex SDK - The FlashLex SDK is both what the FlashLex service uses and what your custom application will use to manage messages.
-
The FlashLex Message Database - This is an local message database used to store and manage messages by the SDK.
The flashlex-iot-python distribution is an open source project on github.com where the SDK is actively managed by the FlashLex Community.
Its easy to collaborate and share you experiences and help others. Just join the FlashLex Python3 Thing SDK Gittr Channel
Downloading Your Thing’s SDK Distribution
You will need to download and install your thing’s sdk distribution. Each thing has a simple zip bundle created for it packed full of everything needed for that thing to send and recieve messages through FlashLex.
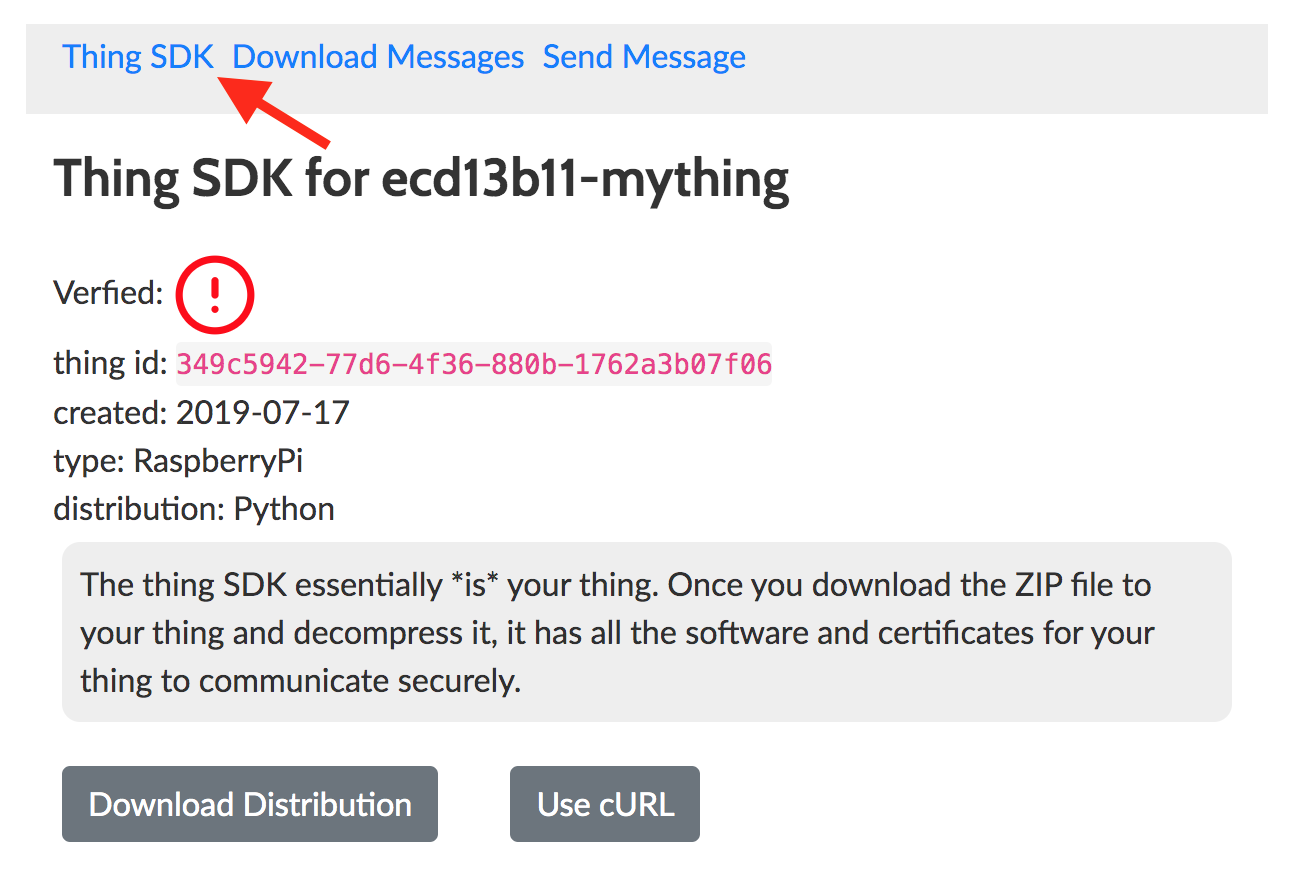
To get that distribution go to the the specific thing’s page on FlashLex and click the "Thing SDK" nav link on the thing navbar.
There are two ways to download and install your thing’s distribution:
-
In Browser Download - Download the distribution from FlashLex in your browser and then copy the file to your thing. The zip file will be writtento your browser ~/Downloads directory.
-
Use cURL on the Thing - Use a cUrl command to download the distribution using your API access token. SSH into your thing and run the cURL provided in the model window to download the thing distribution.
Installing the Distribution
Installing the Distribution For Stand Alone
You will want to install your virtualenv for the flashlex dist as the first step. From the where you downloaded the zip distribution:
unzip dist.zip
cd flashlex-iot-python/
python3 -m venv venv --system-site-packages
source venv/bin/activate
python3 -m pip install -r requirements.txt
Installing the Distribution For You Thing Application
You will want to install the FlashLex API for use by your custom application. Usually this is done by installing FlashLex using setup.py after you have activated your project’s virtual environment.
cd ~/projects/flashlex-iot-python
pip install -r requirements.txt
sudo python setup.py install
Bootstrapping Your Thing
To insure that your thing is configured and working a bootstrap script is included to setup your thing distribution.
The arguments for bootstrap are intended to tell the application where to find the database file, the certs and the configuration file for the application. Basically if the bootstrap runs you can be pretty confident that your thing will work with FlashLex.
-
The FlashLex Configuration File - Contains all the application configurations and secrets.
-
Keys Directory - Where to find the keys that allow your thing to securely communicate.
-
Data Directory - Where the message database is stored that the SDK reads and writes to.
parser.add_argument("-c", "--config", action="store",
    required=True, dest="config", help="the YAML configuration file")
parser.add_argument("-d", "--data", action="store",
    required=False, dest="data", default="{0}/data".format(dir_path),
    help="the directory path for thing message data storage")
parser.add_argument("-k", "--keys", action="store",
    required=False, dest="keys", default="{0}".format(parent_dir),
    help="the directory path for keys")
You will want to make sure that you have your virtual environment activated with the command source /venv/bin/activate prior to running.
From the flashlex-iot-python distribution directory:
python -u bootstrap.py -c $(pwd)/../config.yml -d $(pwd)/data -k $(pwd)/../.and the bootstrap program should attempt to both send messages to flashlex (egress) and recieve messages (ingress)
https://api.flashlex.com/dev/v1/things/349c5942-77d6-4f36-880b-1762a3b07f06/collect {'foo': 'bar'} {'Authorization': 'Bearer eyJ0eXAiOiJKV1QiLCJhbGciOiJSUzI1NiIsImtpZCI6IjM0OWM1OTQyLTc3ZDYtNGYzNi04ODBiLTE3NjJhM2IwN2YwNiJ9.eyJleHAiOjE1NjM1ODgxOTIsIm5iZiI6MTU2MzU4NzQ3MiwiaXNzIjoidXJuOnRoaW5nOjM0OWM1OTQyLTc3ZDYtNGYzNi04ODBiLTE3NjJLTRmMzYtODgwYi0xNzYyYTNiMDdmMDYifQ.PIqethE9nPB1MxdrnnauIjjOfRUFRx8uSBLVgTpXoKVB1XAXziJ6dU2yYrbMczrPiUurC1z-kSNiSO_yZt2HZDyjg6XcuXi--peAioo8UYgWy7iQEhZl0i62sWVYWyxKEh5C3kRWxmbDrTpsEWiDJ0-pupgFUps8h-UQUnGjjEFcwFXvDLScdM25UlVKf6WjcNIG0e3HC1Xr5BgZ80_kClOvBP8sQaw', 'Content-Type': 'application/json'}
{
"status": "OK",
"code": 200,
"messages": [{
"key": "message",
"value": "Message collected."
}],
"result": {
"message": "Message collected.",
"flthingspk": "349c5942-77d6-4f36-880b-1762a3b07f06",
"flmessagespk": "b8ef3524-9836-432b-83b2-18a5d97dbaa7"
}
}
INFO 2019-07-18 08:26:36,762 publish 258 : Performing sync publish...
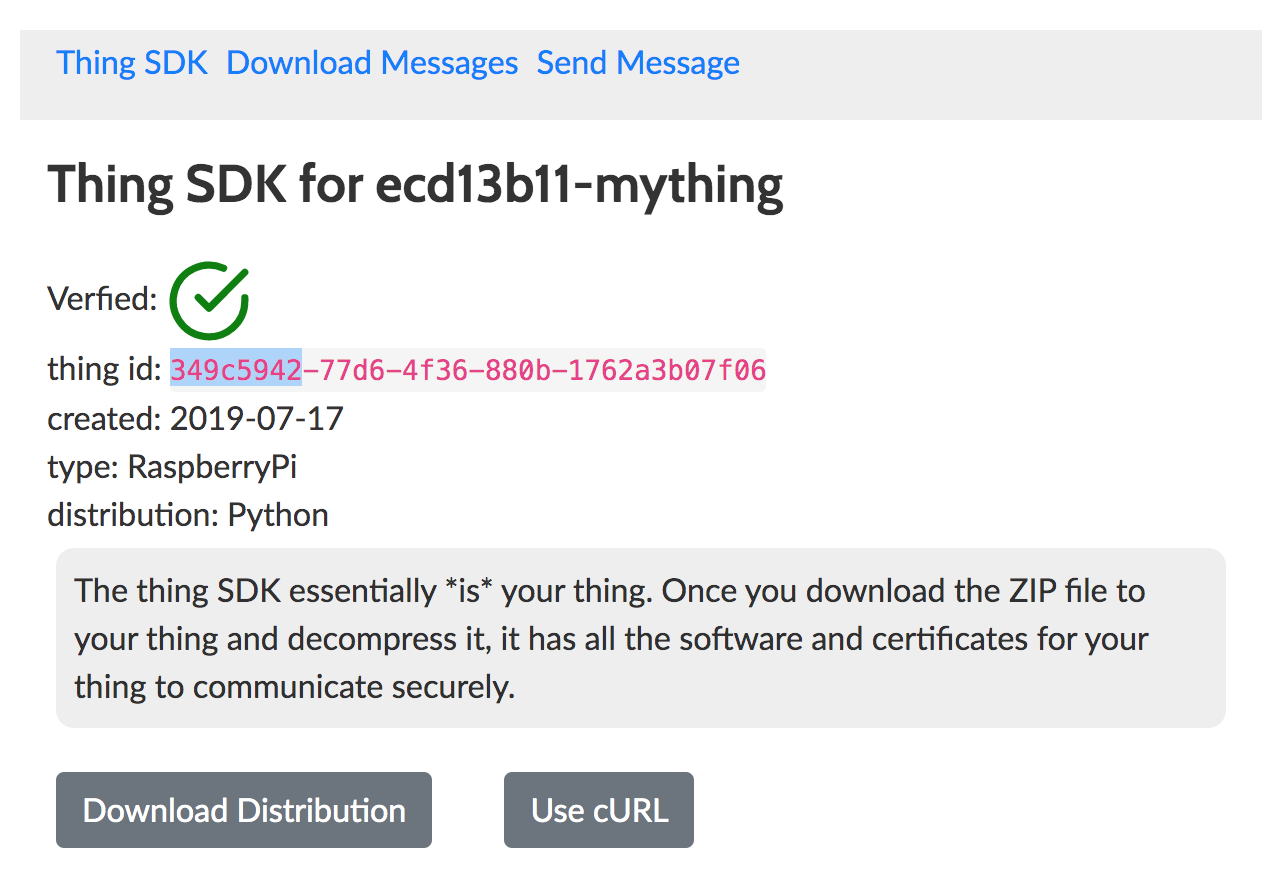
INFO 2019-07-18 08:26:36,964 run 170 : Published topic flashlex/test: {"thingId": "349c5942-77d6-4f36-880b-1762a3b07f06", "thingName": "ecd13b11-mything", "message": "This is a really basic message.", "sequence": 0}Once the bootstrap has been run you should be able to see that the status of the thing has been verified.
The FlashLex Configuration File
The FlashLex Configuration File is the primary configuration for the FlashLex service and SDK to know how to instrument, secure and route messages for your thing. When your distribution is created a boilerplate configuration file is also automatically created for your thing with the basic information required to run teh bootstrap.
| It is completely ok to modify or edit the config but remain mindful that the FlashLex service will also need to use a working config and that you may have to restart the service when changes are made. |
flashlex:
  app:
    api:
      endpoint: https://api.flashlex.com
      env: dev
    callback: persistent
    thread: subscribe
    message: This is a really basic message.
    db:
      subscriptionData: subscription.json
      expireSeconds: 60 #messages older than an hour
  dist:
    commitSha: 75ac348aa2ddc249717516d57ff1f03051179625
  thing:
    id: 349c5942-77d6-4f36-880b-1762a3b07f06
    name: ecd13b11-mything
    endpoint: a1khvirpxw0646-ats.iot.us-east-1.amazonaws.com
    keys:
      rootCA: root-ca-cert.pem
      cert: ecd13b11-mything-certificate.pem
      privateKey: ecd13b11-mything-keypair-private.pem
      publicKey: ecd13b11-mything-keypair-public.pem
    mqtt:
      pubsub:
        topic: pubsub/ecd13b11-mything
      ingress:
        topic: ingress/ecd13b11-mything
      egress:
        topic: flashlex/collect
      useWebsocket: false
      port: 8883
      autoReconnectBackoffTime:
        baseReconnectQuietTimeSecond: 1
        maxReconnectQuietTimeSecond: 30
        stableConnectionTimeSecond: 10
      offlinePublishQueueing: -1
      drainingFrequency: 2
      connectDisconnectTimeout: 60
      mqttOperationTimeout: 120
Running FlashLex IOT on the Command Line
Now that you have bootstrapped your device you will want to test that your thing can recieve messages. You will want to make sure that you have your virtual environment activated with the command source /venv/bin/activate prior to running. From the flashlex-iot-python distribution directory start by running the flashlex app from the command line:
(venv) $ python -u app.py -c $(pwd)/../config.yml -d $(pwd)/data -k $(pwd)/../.

starting flashelex app.
INFO       2019-07-20 08:16:21,535 __init__                             87  : MqttCore initialized
INFO       2019-07-20 08:16:21,536 __init__                             88  : Client id: ecd13b11-mything
INFO       2019-07-20 08:16:21,536 __init__                             89  : Protocol version: MQTTv3.1.1
INFO       2019-07-20 08:16:21,536 __init__                             90  : Authentication type: TLSv1.2 certificate based Mutual Auth.
INFO       2019-07-20 08:16:21,536 configure_endpoint                   139 : Configuring endpoint...
INFO       2019-07-20 08:16:21,536 configure_cert_credentials           131 : Configuring certificates...
INFO       2019-07-20 08:16:21,540 configure_reconnect_back_off         151 : Configuring reconnect back off timing...
INFO       2019-07-20 08:16:21,540 configure_reconnect_back_off         152 : Base quiet time: 1.000000 sec
INFO       2019-07-20 08:16:21,541 configure_reconnect_back_off         153 : Max quiet time: 30.000000 sec
INFO       2019-07-20 08:16:21,541 configure_reconnect_back_off         154 : Stable connection time: 10.000000 sec
INFO       2019-07-20 08:16:21,541 configure_offline_requests_queue     181 : Configuring offline requests queueing: max queue size: -1
INFO       2019-07-20 08:16:21,541 configure_draining_interval_sec      186 : Configuring offline requests queue draining interval: 0.500000 sec
INFO       2019-07-20 08:16:21,541 configure_connect_disconnect_timeout_sec  143 : Configuring connect/disconnect time out: 60.000000 sec
INFO       2019-07-20 08:16:21,541 configure_operation_timeout_sec      147 : Configuring MQTT operation time out: 120.000000 sec
INFO       2019-07-20 08:16:21,542 connect                              190 : Performing sync connect...
INFO       2019-07-20 08:16:21,553 connect_async                        199 : Performing async connect...
INFO       2019-07-20 08:16:21,553 connect_async                        200 : Keep-alive: 600.000000 sec
INFO       2019-07-20 08:16:22,002 subscribe                            292 : Performing sync subscribe...
Sending a Test Message (Ingress)
Once the subscribe has started your thing is listening, its then possible to test that your thing is receiving messages from the FlashLex web console. Just go to the "Send Message Tab" and submit a message for your thing to recieve.
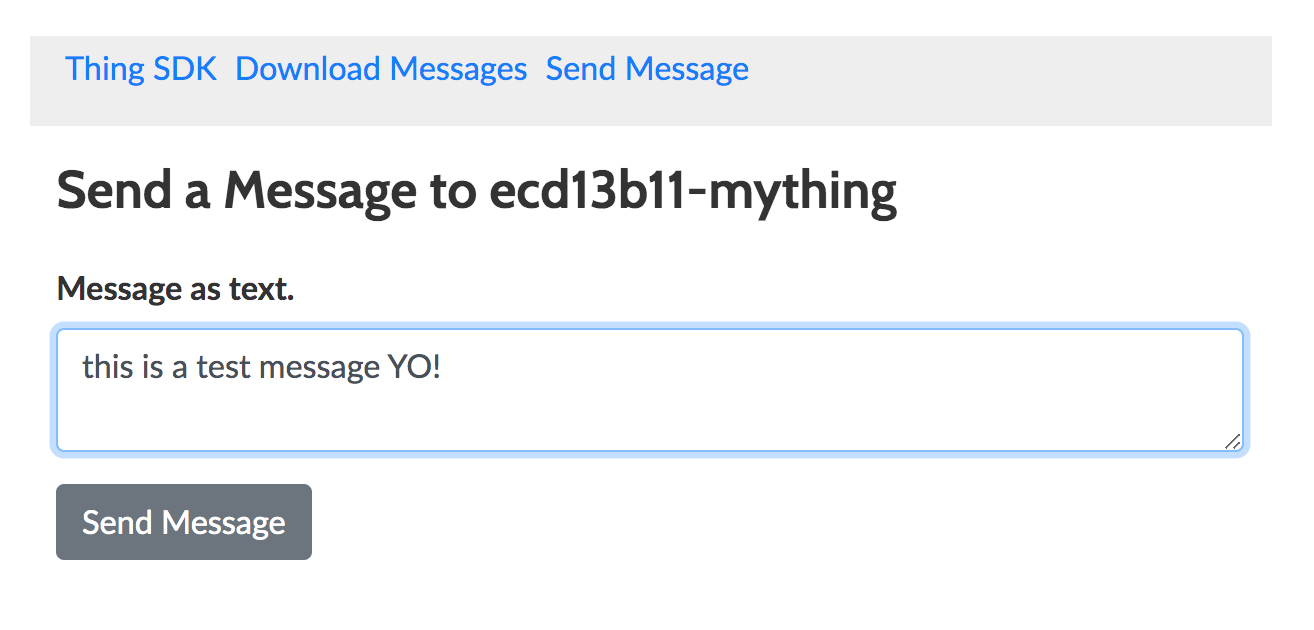
If you have the app.py running on your thing you should see the message you created on the FlashLex web console be recieved (ingress) and displayed.
Received a new message on client:ecd13b11-mything type:persistent:
{"message":{"message":"this is a test message YO!"}}
from topic:
ingress/ecd13b11-mything
Running FlashLex IOT as systemctl Service
You will probably want to run both your application as well as the flashlex app as a systemctl service. That’s because if your thing reboots or power is shortly discontinued and the system starts back up you will want an orderly orchestration of the services so they can start recieving or sending messages to flashlex. We have included a sample service defintion for flashlex that you will want to edit for your own installation.
Youc an find helpful tutorials on the internet on making services for your thing. Here is one that is pretty good:
Start by making the service file that will be installed. This is done by running the makeservice.py script which uses the current directory to render the template correctly.
From the flashlex-iot-python distribution directory:
python makeservice.py -t $(pwd)/flashlex.service.mustache -d $(pwd)>flashlex.serviceNow that you have generated the flashlex.service file you can install it:
sudo cp flashlex.service /lib/systemd/system/flashlex.service
sudo chmod 644 /lib/systemd/system/flashlex.service
sudo systemctl daemon-reload
sudo systemctl enable flashlex.service
sudo systemctl start flashlex.service
The flashlex.service systemctl should be running, you can check the status:
pi@raspberrypi:~ $ sudo systemctl status flashlex.service
● flashlex.service - flashlex
   Loaded: loaded (/lib/systemd/system/flashlex.service; enabled; vendor preset: enabled)
   Active: active (running) since Sat 2019-07-20 03:00:01 PDT; 18h ago
 Main PID: 14574 (python)
   CGroup: /system.slice/flashlex.service
           └─14574 /home/pi/projects/flashlex-iot-python/venv/bin/python -u /home/pi/projects/flashlex-iot-python/app.py --config /home/pi/projects/flashlex-iot-
Collecting Messages (Egress)
Collecting messages is when you want to send messages out from the thing, this could be information that has been collected from the thing that you would like to use for you application.
Sending a message from your thing
Your thing uses its certificate to send messages out to flashlex, and the FlashLex API, as well as a bash script included in the distribution allow you to send messages from your thing to FlashLex to be stored for later retrieval.
Using the command line to Egress a message
echo '{"foo":"bar"}'|python -u collectmessage.py -c $(pwd)/../config.yml -k $(pwd)/../.
collecting message from thing: 349c5942-77d6-4f36-880b-1762a3b07f06
/Users/claytongraham/data/github/claytantor/flashlex-iot-python/keys
https://api.flashlex.com/dev/v1/things/349c5942-77d6-4f36-880b-1762a3b07f06/collect {'foo': 'bar'} {'Authorization': 'Bearer eyJ0eXAiOiJKV1QiLCJhbGciOiJSUzI1NYzNi04ODBiLTE3NjJhM2IwN2YwNiJ9.eyJleHAiOjE1NjM2ODcyMzMsIm5iZiI6MTU2MzY4NjUxMywiaXNzIjoidXJuOnRoaW5nOjM0OWM1OTQyLTc3ZDYtNGYzNi04ODBiLTE3NjJhM2IwN2YwNiIsImF1ZCI6InVybjpmbGFzaGxleDozNDljNTk0Mi03N2Q2LTRmMzYtODgwYi0xNzYyYTNiMDdmMDYifQ.fuUr4KZM58UqL30LMo29_QbRF7ljGl3jKQ0mBOu04WAPe8YnAtHLXuc1tRSXKz7Yy7zlFnuqQtf7xqIhggjPitmSsO6Tc3oLqrX2YHNfhTgncaFYgejeMOJyILcJa9MW41kx9Vyp5JAlP08AysgFlx1gEFTzvAkFyYT0bewVOwDMKlPbm8G_ZSwUsjHKpYuYe-YyUD2sp-emL3-6xds3GR-yhV3dJSGdectQqhSvd0EeUyc_NJodj90wQdw', 'Content-Type': 'application/json'}
{
	"status": "OK",
	"code": 200,
	"messages": [{
		"key": "message",
		"value": "Message collected."
	}],
	"result": {
		"message": "Message collected.",
		"flthingspk": "349c5942-77d6-4f36-880b-1762a3b07f06",
		"flmessagespk": "9371ead9-c456-4420-99f0-99dd914e55e9"
	}
}
FlashlexSDK Collector Status Code: 200
Using the FlashLex SDK to Egress a message
It is possible to egress a message from your thing using the FlashLex SDK. The python command line application collectmessage.py is also an example of how its done. You will need to have the FlashLex API installed in your appication directory’s virtual environment to do that.
# now send a message to the collector
flashlexSDK = FlashlexSDK(config)
status_code = flashlexSDK.collectMessage({'foo':'bar'})
print("FlashlexSDK Collector Status Code:",status_code)
Using FlashLex to Collect Egressed Messages
There are two ways to collect messages that have been egressed fom your FlashLex thing. The first is to use the FlashLex web console. There is a form that will let you download all collected messages over a time period and within your retention policy.

A zip file will be downloaded to your ~/Downloads directory. You can unzip it and inside you will see a single file for every message sent.
$ ls ~/Downloads/349c5942-77d6-4f36-880b-1762a3b07f06_messages_2019-07-21/
1bdae18a-d97f-48ac-8256-f753de1c032f.json*
$ cat ~/Downloads/349c5942-77d6-4f36-880b-1762a3b07f06_messages_2019-07-21/1bdae18a-d97f-48ac-8256-f753de1c032f.json
{
	"payload": {
		"foo": "bar"
	},
	"flthingspk": "349c5942-77d6-4f36-880b-1762a3b07f06",
	"messagetype": "egress",
	"fltimestamp": 1563587144,
	"datecreated": "2019-07-20T01:45:44Z",
	"fluserspk": "ecd13b11-6d91-4e8e-9156-60e451a3c975",
	"flmessagespk": "1bdae18a-d97f-48ac-8256-f753de1c032f"
}